.

Showing posts with label Olivia. Show all posts

Monday, January 24, 2011

Olivia Workshop Layout #4

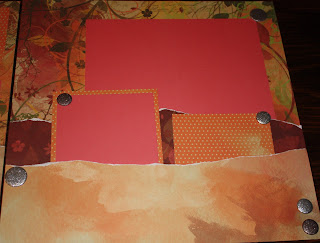
I was so inspired by this paper set that I did a little creative cutting on this layout. Even though I cut the tar out of the light floral B&T, I still had a 4 x 8 section leftover to use on my first layout and was able to cut that flower out of the leftover.


Sometimes when I do these free-handed cuts, I start with a basic square cut, but I didn't with this one. I just followed the lines that were already part of the design. Once they are cut out, the 4 x 8 is square cut, avoiding the large flower that I used on the 1st layout. As for the est of the page, I cut a 4 x 12 and a 4 x 2 of the polka-dot Sunset B&T and tore the long edge of the 12 x 4 and 2 edges of the 4 x 2. All these edges I distressed by scraping them through Bamboo ink. (Gold ink would've worked better for it if I had any!)
I added a couple of Shimmer brads to opposite corners of the layout. To decorate the top right I stamped on a scrap of some leftover B&T in Barn Red. I overlapped several large leaves and then cut out the whole grouping together. If I had it to do all over again, I would probably have matted this grouping on a lighter color of cardstock, like Bamboo. That would really make it pop!

Friday, January 21, 2011

Olivia Workshop #3

This is the layout that came with the Olivia workshop. A color brochure with complete instructions is included with the kit. If you buy ANY set, this one should be the one! It is positively gorgeous!
I've only just decided what photos to use on this page and I can't wait to get them on there. The brochure includes three 5 x 7 pictures with 2 of them landscapes on the left page and the other portrait on the right page. It also includes six 2 x 2 photos with 3 on the left side of each page. All of the photos match the rest of the paper by being sanded on the edges - yes, on the edges of the actual photos. AND the portrait photo on the brochure shows a little of the picture sanded off and a stamped sentiment in the sanded area. I am SO doing that!
In keeping with the sanded theme, the stamped images (I hate cutting out stamped images, but they end up looking SO nice!) are also sanded a bit in the middle and coupled with some 2nd generational stamping.

Thursday, January 20, 2011

Olivia Workshop Layout #2

This layout isn't an original, so I can't give exact cutting dimensions, but I can tell you that it is the "Enchantment" layout from the Magic Scrapbooking program, on page 78. I can also tell you that I altered the original cutting directions in order to save paper. I cut the 1/2 inch strip of Colonial White for the top of the left page, but instead of making the 12 x 11 big cut for the right-hand page, I made two separate cuts. The first was 1/2 x 12 to go all the way across, but the second cut is only 2 x 10 1/2.
I distressed all of the Colonial White pieces in Bamboo ink the same way. I apply the ink to an empty block and then swirl it onto the paper in little circles until most of the ink is gone. Then I reink the block and repeat the process until the distressing is the way I want it.

On both pages, the base is Bamboo. The top, orange section is the backside of the bright green, floral B&T. The middle section is the watercolor B&T and I put just a few random stamps using the small leaf stamp (that comes with the workshop) in Barn Red ink. Then the bottom section that spans the 2 pages is the stripe. I didn't randomly stamp the stripe, it actually comes that way, but I did stamp the Bamboo base at the bottom. I used Bamboo for the large stamp, Autumn Terra Cotta (as I didn't have the Sunset stamp pad at the time) in a 2nd generational stamp with a long, skinny leaf, and I used the same small leaf in Barn Red, too.

I added a "Delight" to the top of this page, thinking that it would be appropriate no matter what photos I choose to put on the page. I also randomly placed some of the Shimmer brads to give the layout a finished look to it.

Wednesday, January 19, 2011

Olivia Workshop Layout #1

Since I already had some of the pages out, even though I haven't finished the pages with photos, yet, I thought I would go ahead and give the instructions for these pages. This double is my own layout, so I can actually give cutting dimensions.

The right pages is a pocket page with inserts that act as photo mats. I always wondered how anyone could use a pocket page in their album because the inserts would be so hard to reach from the top. They are, if you're reaching in from the top, but not if you cut a slit into the plastic. You will need to slice the page protector the width of the insert plus a hole punch on each side so the slice won't extend too far. I usually make my slice just below the top of my insert. That way my insert can stick out just a little without removing protections for the photo.


The left page is a continuation of the right, in look, but it isn't a pocket page. I used some little "belts" to continue the theme, but even though the pictures can tuck up under them, no slits are necessary to view these as they are not removable.
The left base is the darker leaf B&T and the right base is the light floral B&T. The left layout has a 4 x 12 cut (although it can be 4 x 8) of the light floral B&T and is aligned on the right-top of the base page. A 5 x 12 cut of the watercolor B&T lies at the bottom of the base page, but I tore the top edge all the way across before I stuck it down. On top of this is a 4 x 6 of the Sunset polka-dot with the top edge torn. I added another strip of the paper cut 1 1/2 x 6 that I actually wrapped around the corner of a 5 x 7 piece of Smoothie paper. I tore the long edge of the strip first. I also added a 3 x 3 piece of Sunset polka-dot at the top-right. The final card is a 4 x 6 Smoothie mat off-set on the left side of the page. I cut out one of the flowers from the light floral B&T and overlapped the 4 x 6 mat as a final touch.
The right layout starts at the bottom with a 6 x 12 of the dark leaf B&T with the top edge torn all the way across. It was placed directly on the bottom of the base, but the torn side is left clean of adhesive so that the pocket can be made. On top of the dark leaf pocket, also directly against the bottom of the base is a 5 x 12 of the watercolor B&T (top edge torn). I applied a u-shape of adhesive to the B&T to make a pocket section, as well. Under the dark leaf pocket I tucked a 7 x 8 piece of Smoothie as a photo mat. The inserts for the watercolor pocket include a 4 x 5 of the Sunset polka-dot and a 5 x 7 of the same paper overlaid with a 6 1/2 x 4 1/2 of Smoothie cardstock. I added the Shimmer brads to the two inserts to act as handles.
I didn't use any stamping on this page as it was perfectly embellished with just the shimmer brads and I felt more stamping would make it quite busy.

Tuesday, January 18, 2011

Olivia, Mistletoe, and Hooligan Workshop Sets Will be Gone at the End of the Month!

This is just one of the Olivia layouts that I'll be posting and giving directions for in the next few days. This is one of the most beautiful sets I've worked with and I highly recommend it! The kit comes with a stamp set that was created especially for this workshop and it also includes the shimmer brads in bronze, silver, and gold. The set is only available through the end of the month. Contact me this week if you want to order it! See the flyer for the workshop and another example HERE.


These layouts were made with the new, traditional Mistletoe set. This set makes some BEAUTIFUL layouts and it again comes with a set of embellishments (Mistletoe) and a stamp set created for the workshop. Both of these sets come with a full-color brochure, by the way. But like the other, the Mistletoe workshop kit is only available for the rest of the month of January. See the workshop flyer and another example HERE.


Hooligan was also a fun workshop, but I don't have any pictures of it. However you can see an example of it on the flyer HERE. It, like the others, comes with a special stamp set and a set of embellishments as well as a color brochure.